Versions of the last years of macOS or OS X I come with the application QuickTime Player included in the opal system. An excellent application when it comes to running video media files and screen recording (Record of the screen video) or audio.
We do not know for what reasons, but Apple does not allow the QuickTime Player to make Audio screen recording. Users having a choice what they want to register. Sound or image. It is most likely a protection measure for copying films or other materials protected by copyright. As the audio recording source through Quicktime Player, only available "Built-in Microphone"(Mac microphone) or" none ".
Fortunately, there is a very functional method by which we can get rid of these Quicktime Player limitations and set the application to do screen record with audio. It takes a lot of attention to the next steps.
How to do Screen Recording with Audio on Macos using the QuickTime Player application (tested on Macos Mojave 10.14.5 beta)
Quicktime Player offers us three registration solutions:
– Movie Recording - video capture and sound from the camera at MacBook and the built -in microphone,
– Audio Recording - Sound recording using the internal microphone
– Screen Recording - Video recording of the whole screen, but without sound
These three options are available in the "File" menu of the QuickTime Player application.
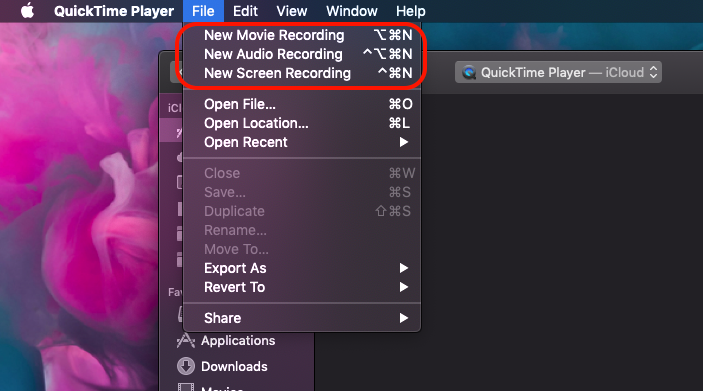
In our tutorial we will focus on the third option and see how we can do an audio screen on the Quicktime application.
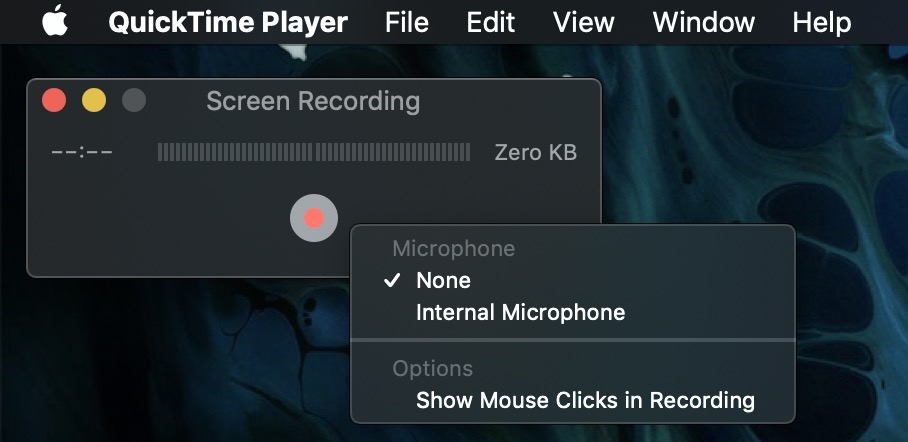
By Default, at "Screen Recording" we have the opportunity to record the video, but with sound from the internal microphone (internal microphone) or not (none).
If we need to do Video tutorial for example, to also includes sound from the system, then we need to install the extension Soundflower. This application extension will allow us to do screen recording cu audio in QuickTime Player. Sign version for Macos Mojave you can find it at this address: https://github.com/mattingalls/Soundflower/releases/tag/2.0b2 .
With the launch of new maccos versions, Apple has greatly strengthened security, and as a result it is a little harder to install applications that interact with the hardware and the Mac operating system.
How we install Soundflower on Macos Mojave or Newer versions
1. Download the latest version of the Soundflower application and before installing Terminal On Macos, where you run the command line:
sudo spctl --master-disable
This command line allows you to install applications from all sources. More details can be found in This tutorial.
2. Go in System Preferences → Security & Privacy → Select "Anywhere"To allow the installation of applications from all sources.
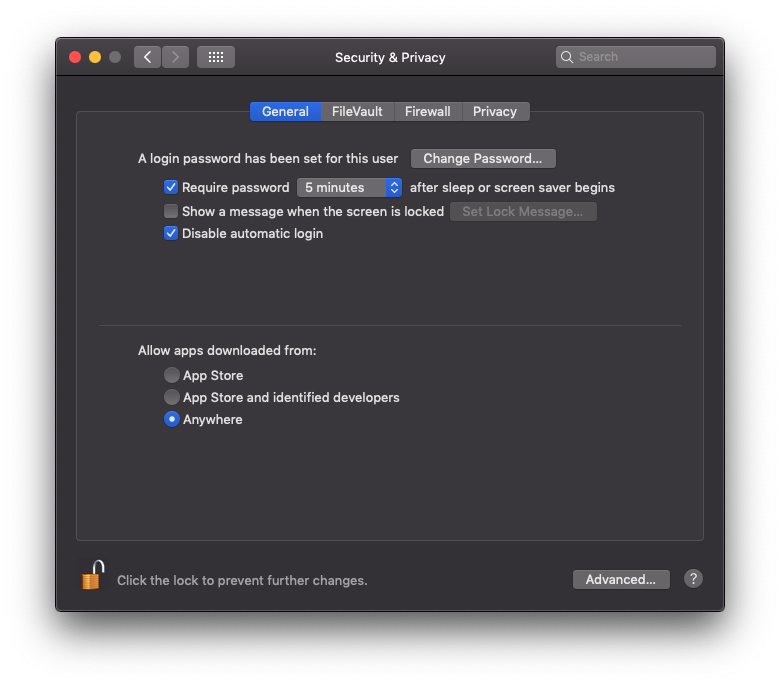 If the "Anywhere" option is not selectable, click on the lock on the left-hand and enter the system password.
3. Roll the Soundflower installation package. During the installation period you will be required to enter the system password.
4. Wait until the installation is completed and receive the message that Soundflower has been successfully installed.
5. Restore the system. Reboot / restart.
It is indicated that after Soundflower has successfully installed and you have restarted the system, open the terminal and execute the line:
sudo spctl --master-enable
Soundflower Setup for Screen Recording with sound in quicktime player
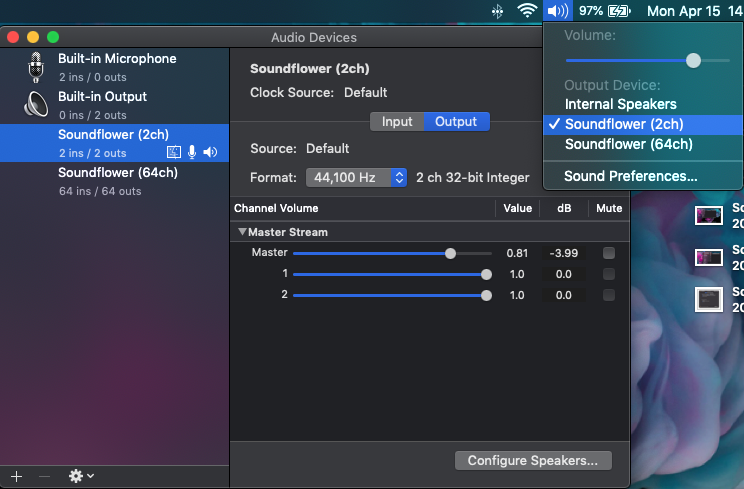
We open the user Audio MIDI Setup (Find it in the applications installed by default on the system → OTher) and set Soundflower (2CH) for "Sound Output". We also check not to be checked "mute" next to the output channels from the "output" tab, and the sound control should be set to "Soundflower (2ch)".
See with great careful Screen below:
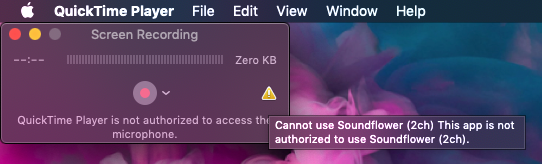
If your settings are identical to those in the image above, everything should go smoothly. But there are situations in which the following error appears: “QuickTime Player is not authorized to access the microphone"And an exclamation mark with yellow that will say:"Cannot use Soundflower (2ch) This app is not authorized to use Soundflower (2ch)“.
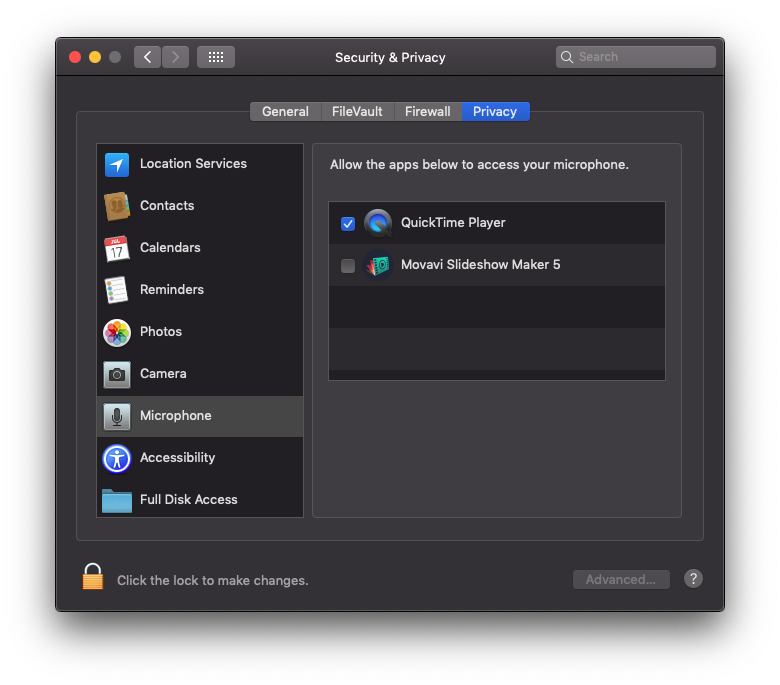
To solve this problem, Close all Quicktime Player Then go in System Preferences → Security & Privacy and select "Microphone"From the left side. Tick quicktime player.
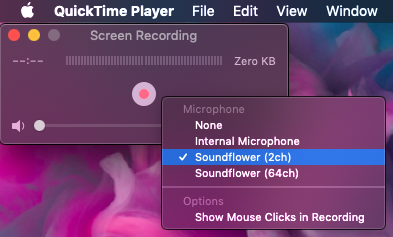
open QuickTime Player → File → New Screen Recording. Click on the small arrow next to the Recording button and select as a microphone source: Soundflower (2ch).
Start Screen Recording. At this moment Quicktime Player will record the video and sounds on the system. Alerts, music, system sounds, etc.
Remember that at the "Volume" control icon in the bar you have to set Soundflower (2CH) to "Output Device“.
It is a very simple and safe solution by which you can make a sound recording with sound (screen recording with audio) using the QuickTime Player application.


Hello, I wonder if it is possible to come to the sound of a previously shot screen recording video with any setting, etc.
I did everything as it is written, but the sound is still not written :(
Okay, but what to do to hear what is recorded too?
I have a MacBook Pro, I can't install Soundflower, it seems to go through the whole installation (I allow you to install it in your preferences), but at the end, with the summary, there is a message "The installation failed to say the installer encountered an unknown error that prevented installation." Do you know why?